Device
Device being stuck on "Nayax" screen during power-up- communication issue:
This could happen due to multiple reasons:
- Modem connection issues/bad cellular reception/ connected to ETH, and the connection is poor. Do you happen to use ETH? Or have the devices near something that would block cellular reception?
- Wrong modem type (for example, a European modem in the US) or a modem that is not too strong. Which modem type are you using?
- SIM card not installed/supported (for example, a SIM card that you bought outside of Nayax)/all used up. Which SIM are you using?
- The antenna is not appropriately connected/ wrapped up around itself/pointing downwards/ around a metal box. Can you have a look at it?
- If the device reaches the Nayax logo and then crashes, do you have a 24V power source with a minimum of 1.5A?
The device is connected to the Marshall cable, but the device is in Cash Only mode.
Which COM have you connected to your board? Is it COM2 as mentioned in the "Installation Guide"? If you're using a Chipi-X (a specific USB-to-serial adapter, the only one that grants support privileges), does it appear to be connected to a hub? Try connecting it directly to the PC.
Everything is connected as expected, but things still don't work- what now?
- Check the parameters in Nayax Core.
- Check that the physical connection meets the instructions in Installation Steps.
- If OK, reboot the device:
- Disconnect from power
- Wait for the screen to go black
- Power the device back on
- Check that in the SDK code, you changed the COM port to the correct one.
- Compile and Run the SDK: a. Do you see the peripheral simulator's menu and pairing process displayed in the prompt window? b. Do you see in the log file that the Pairing process ended successfully?
Using 12V power source (instead of 24V)
12V is on the verge of not being sufficient power for the device to operate (it would make it hard for the device to distinguish between '0' and '1'). It can also cause packets to be sent/received improperly (leading to retries) and result in CRC errors. It can also cause the device to crash during powerup as during the powerup process there is a spike in energy consumption. In addition, if you are using Chipi-x, it also consumes energy, making the 12V even less likely to be sufficient for the device's valid operation.
VPOSM - Activating the Device
The first step is to scan the QR code displayed on the device screen with the phone’s camera.
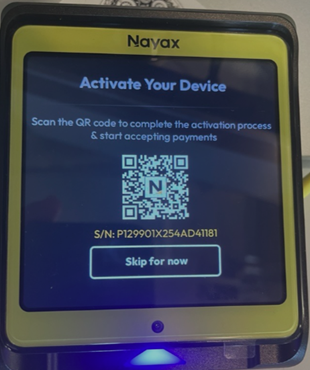
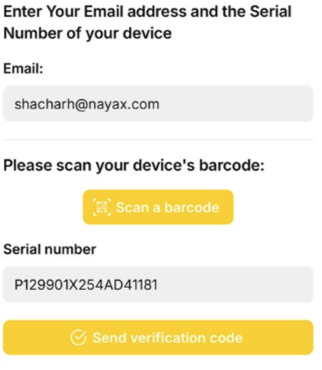
Next, you will be redirected to a landing page where you will be required to enter the following details. After submission, a verification code is sent via email, which must be entered on the landing page to complete the device activation.
**Note: **VPOSM 4S is not yet supported (only VPOSM5 as of now).
VPOSM (5, 4S): Getting the Device's Details (Serial Number, IP)
You'd tap the top left corner of the screen 7 times, and a menu would appear:
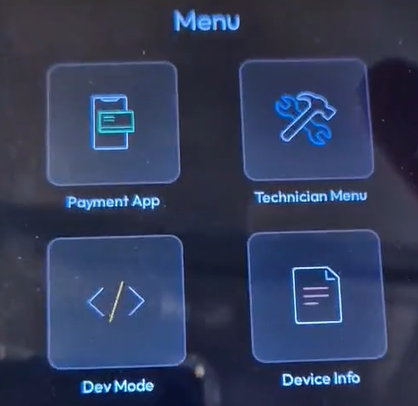
Then you'd click on the Device Info, and you'd get the device's serial number as well as information about its communication details, both cellular and Ethernet.
In this example, the device has an eSIM (as in this example, it's VPOSM 4S, which will always have an eSIM,) and it's also connected to WIFI, so you can see that it's connected to the WIFI and the device's IP address:
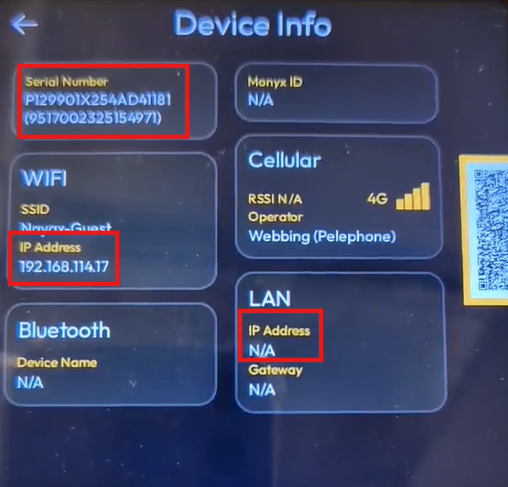
Should you like to return to the device's idle screen (to make transactions), click the top-left arrow, then select the Payment APP screen.
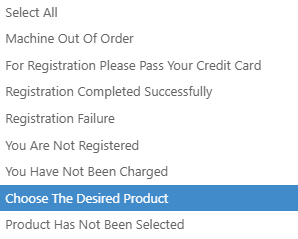
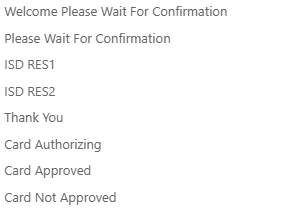
Changing Idle Screen/Customization of Screens/UI Control
At the moment, only the following modifications are available:
-
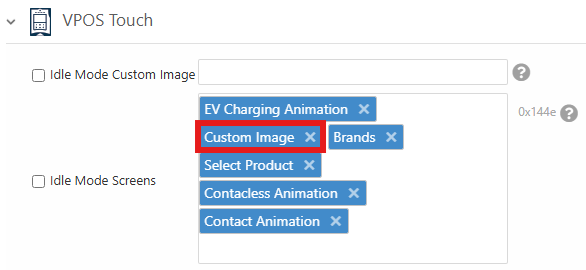
At IDLE state, you can select the pictures/animations to be displayed over our DCS back office. You can also add a customized image, e.g., your company's logo.
-
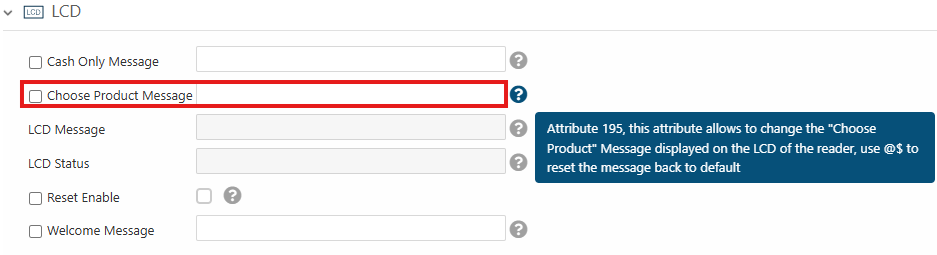
Change the "Please select a product" title.

-
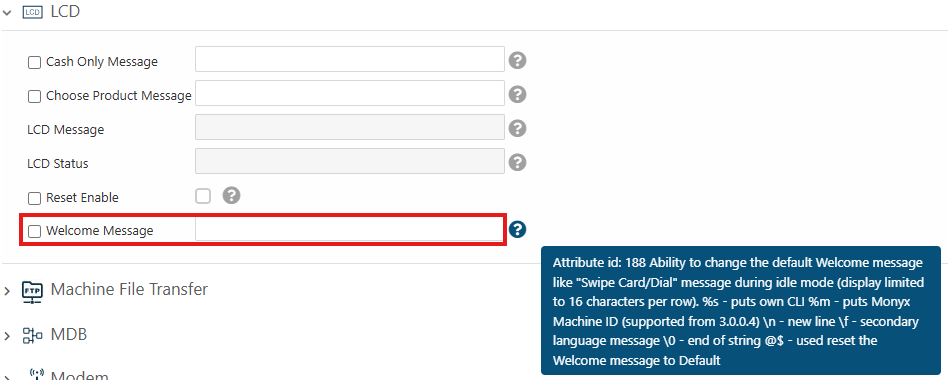
Change the title in idle mode:
-
Or the product selection message:
- Remove the audio of the product selection screen:
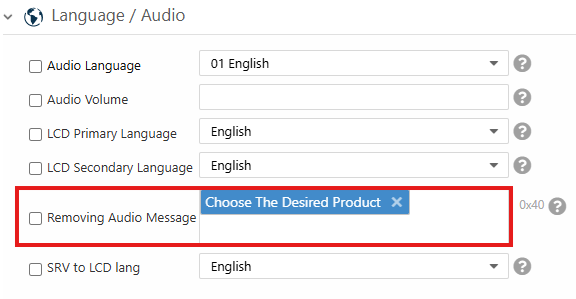
- Removing any of the following audios:
-
At the end of the transaction, you can remove the "Thank you and goodbye" message: both the picture and voice message will not be displayed/played.

For VPOS Touch- During the transaction process, there is not much to do in terms of UI, and neither messages nor images/animations can be customized. Regarding VPOS Media- this is a new product that is at the final stages of development. There is a possibility of editing the screens and animations, but this section will be updated once it is released.
Firmware Update Process
VPOST/ Onyx:
The firmware update is made out of 2 parts- the MAIN update and POS update. For the MAIN update, you'd see "gloader" at the top of the screen, along with a percentage next to it. Once completed, the device would reset itself and start downloading and updating the POS. Please do not touch it until the device resets, as the device's screen will also appear black while the POS is being erased and updated. After completion the VPOST would power itself up and would be in idle mode. This whole process usually takes 30-60 minutes, so keep that in mind.
VPOSM:
TBA
Device's Communication with Nayax's Servers- ETH/Fallback Mechanism
We highly recommend that, even if customers plan to use the ETH connection, they leave the SIM card installed and the antenna connected as a fallback, as we've had many customers experience "hiccups"/issues with the ETH connection. In that case, the VPOST/Onyx would try to use the cellular one.
Decimal place
The Decimal place is a parameter in Nayax Core that is forwarded to the device. In Marshall, said value is forwarded to the peripheral via the Marshall command "Config," which is sent as part of the Pairing process. On its end, the machine should calculate the following value: X = 10 ^ "Decimal place" (i.e. 10 power "Decimal place") For each transaction, multiply the price set in the SDK by this value and send the result to the device. For example: Decimal place = 2 Price = 30 Euros Price to be sent to device: 30 * (10 ^ 2) = 30 * 100 = 3000
• FYI, Credorax accepts transactions from 10 cents and above only. So, if you send one as a price with a 2 decimal places, we will eventually send to Credorax: 1 / 100 = 0.01 Euro, and the transaction will be declined.
SIM not working
The SIMs' recognition depends on the device's APN addresses. Meaning if the specific SIM does not exist there, it won't work. If you encounter an issue with a SIM (received with your device / bought from Nayax)- please contact the Support team- [email protected]
Removing the X button on the device during authorization
Removing the X option can be done by changing the "VPOST button function" to "VPOS cancel button during authorization."
Hardware questions
Q: Is it an actual RS232 interface with a level shifter or UART signals with voltage level 5V/3.3V? A: Yes, true RS232 with level shifter. (The RS-232 standard talks about −15 to −3 V and +3 to +15 V. The electric components that we are using are working about ±7V.)
Q: Are any HW handshaking signals (RTS/CTC) needed? A: No, only RxD/TxD/GnD is used.
Changing the product selection animation to a Smartfridge one
You'd need to send the following file to the device via Machine File:
4010001;devicecoreftp.nayax.net;21;embedded_support;asdf&^%;./automation/General/1742223843-select_smartfridge.264;;f7b4;video\select_smartfridge.264;
Then set the following configuration:
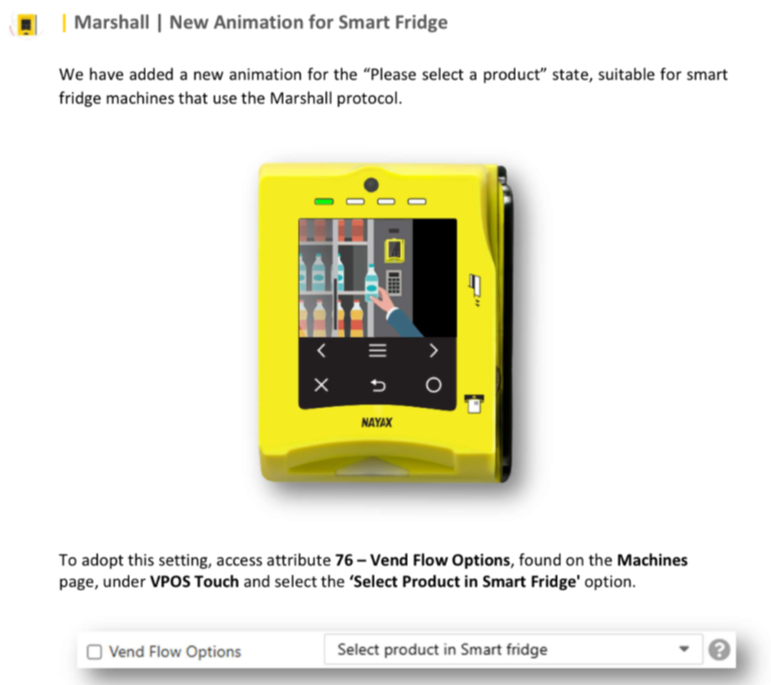
- Note- this feature is relevant starting version 4.0.25.11 and above
Updated 9 days ago