Machine Products
Mapping products to machines, also known as planogram setup, is a critical step in inventory management. This process involves assigning specific products to the bins or selections of a vending machine and defining the machine's layout. A well-structured planogram ensures that the correct products are available in the right quantities, providing clear guidance for inventory tracking and restocking.
You can create product maps in Nayax Core by following the steps below:
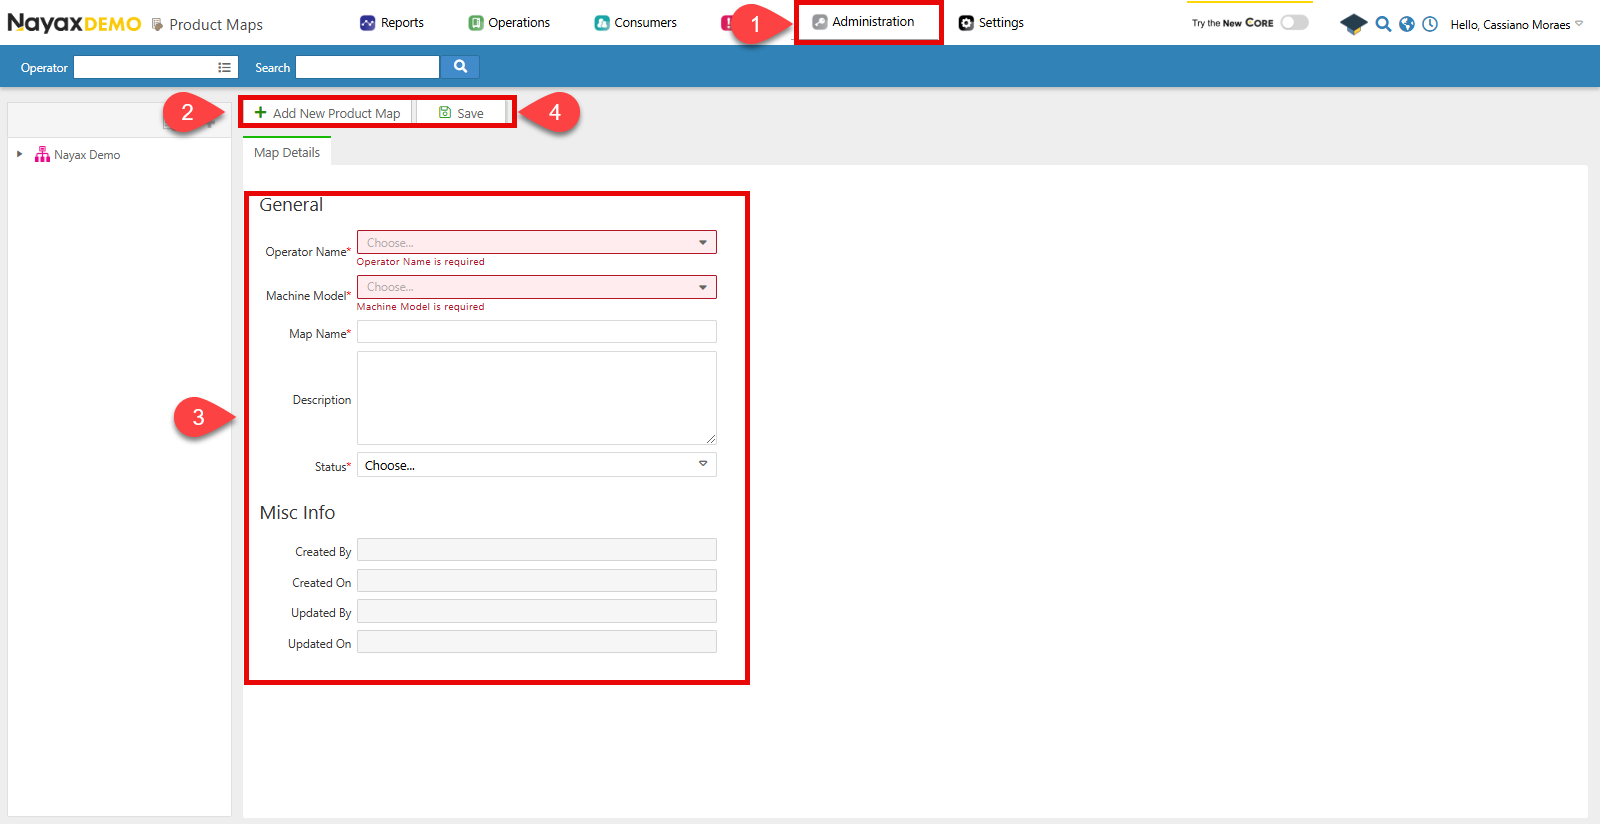
- Go to Administration > Product Maps.
- Click Add New Product Map
- Fill in the required fields for the product map.
- Operator Name: Specify under which operator the map will be located.
- Machine Model: Select which machine the map is for.
- Map Name
- Status: Whether the map is active or not.
- Click Save
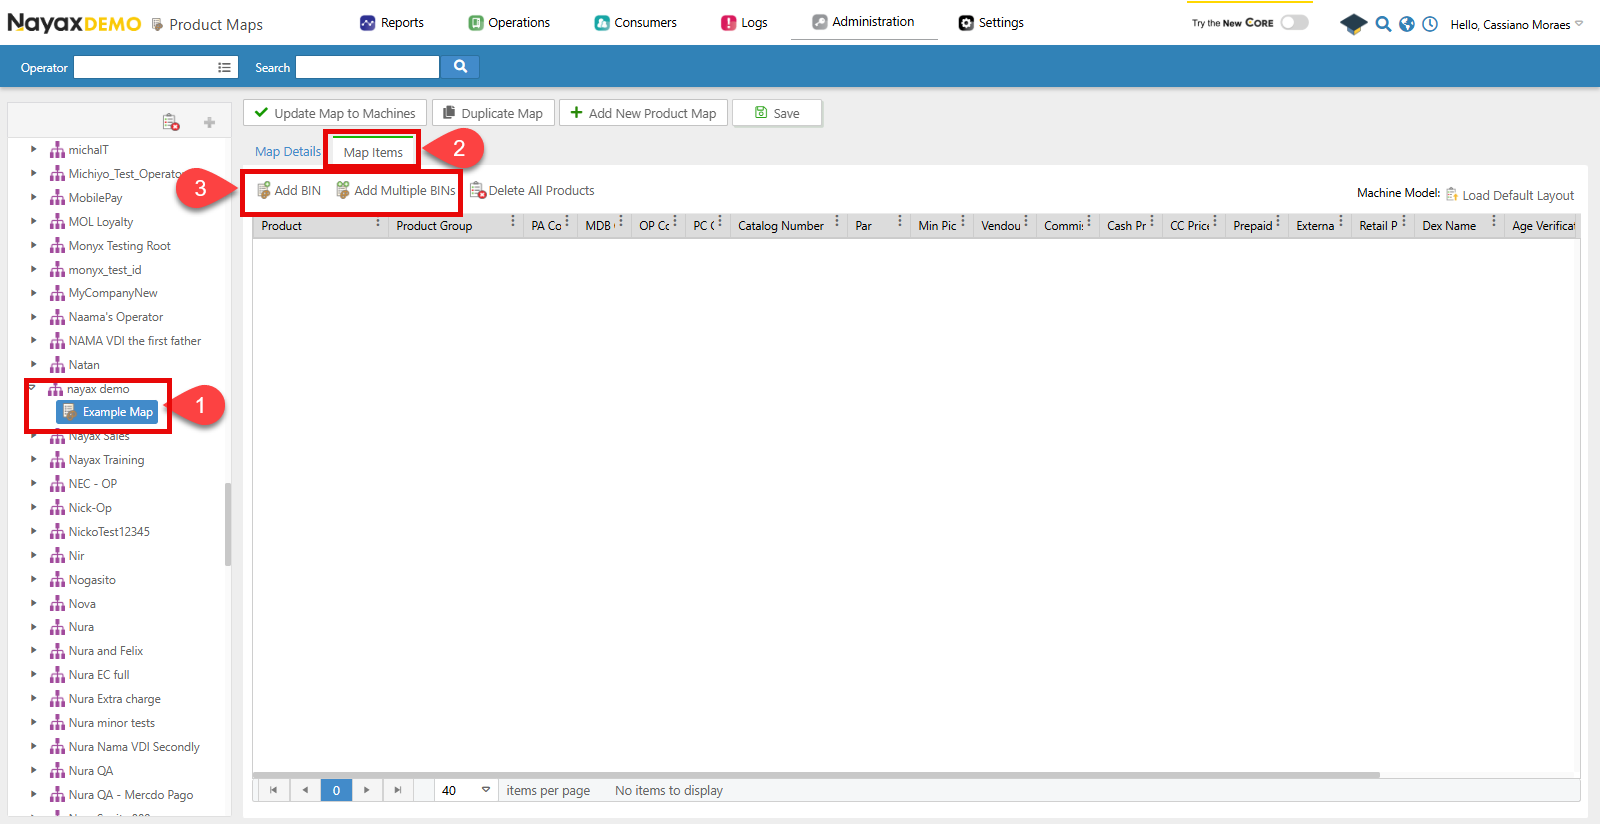
Now, you can add products to this map. Follow the steps below to do so:
- Select the Map from the list.
- Click on the Map Items tab.
- Now you can add a product to this map by clicking:
- Add BIN: This will let you add one product directly to the list.
- Add Multiple BINS: This will bring a pop-up window that will let you select multiple products to add to the map.
Lynx API
With Lynx API, you can add one or multiple products to the Machine's Product Map using the following endpoint:
AuthenticationRefer to the Security & Token page of this documentation to learn how to access your tokens, and how to properly use it to authenticate your API requests.
Add Machine Product
the Create Machine Products endpoint allows you to create the product map for a machine and add products to it by providing the MachineID in the path param of the request. See the example request in the code block below:
curl --request POST \
     --url https://qa-lynx.nayax.com/operational/v1/machines/{MachineID}/machineProducts \
     --header 'accept: application/json' \
     --header 'content-type: application/json' \
     --data '
[
  {
    "NayaxProductID": 0,
    "MDBCode": 0,
    "PAR": 0,
    "CashPrice": 0,
    "CreditCardPrice": 0,
    "MachinePrice": 0,
    "RetailPrice": 0,
    "DEXProductName": "string",
    "PACode": "string",
    "PCCode": "string",
    "ProductMinimumPickQTY": 0,
    "VendOutAlertThreshold": 0,
    "PrePaidCardPrice": 0,
    "OperatorButtonCode": "string",
    "CommissionValue": 0,
    "ExternalPrepaidPrice": 0
  }
]
'
You can add more than one product object in the array. This way, you can add multiple products to the Map with juust one request.
Path ParamsChange the
MachineIDwith the unique identifier of the machine to map its products.
In the body parameters, fill in the following:
| Parameter | Description |
|---|---|
NayaxProductID | A unique identifier for the product in the Nayax system. |
MDBCode | The MDB (Multi-Drop Bus) code associated with the product. |
PAR | The price adjustment ratio for the product. |
CashPrice | The price of the product when purchased with cash. |
CreditCardPrice | The price of the product when purchased with a credit card. |
MachinePrice | The price of the product set directly on the vending machine. |
RetailPrice | The suggested retail price of the product. |
DEXProductName | The product name as it appears in the DEX (Data Exchange) format. |
PACode | The PA (Price Adjustment) code associated with the product. |
PCCode | The PC (Product Category) code associated with the product. |
ProductMinimumPickQTY | The minimum quantity of the product required for restocking or picking. |
VendOutAlertThreshold | The stock level threshold that triggers a vend-out alert. |
PrePaidCardPrice | The price of the product when purchased using a prepaid card. |
OperatorButtonCode | The code used by the operator to select the product manually. |
CommissionValue | The commission value associated with the product. |
ExternalPrepaidPrice | The price of the product when purchased with an external prepaid solution. |
Updated 5 months ago